A recent experiment helped me increase organic traffic by 27% in the last 7 days and 24.5% in the previous 28 days with the help of Rank Math’s schema markup.
Have you ever noticed those special, attention-grabbing listings in Google search results with extra information like ratings, prices, event details, or recipe steps?

Those are called rich snippets, and they help people quickly understand how relevant a page is to what they’re searching for. Rich snippets make your listing stand out and increase your visibility and click-through rate (CTR).
Schema markup is one of the best ways to get rich snippets. And if you’re using Rank Math SEO, adding schema markup to your site becomes super easy.
Schema Markup’s Impact on My Organic Traffic
Before I started using Rank Math’s schema features, my posts were showing up in the regular search results. Even though they were ranking well, I noticed something frustrating, competitors with rich snippets were getting more clicks, even when their content was ranked lower than mine.
Once I integrated schema markup, things started changing within just a few weeks, I implemented this on my friend’s recipe blog, and the posts started displaying star ratings and cooking time.


These changes made a big difference. I saw almost a 27% increase in organic traffic and more engagement, especially on the posts where rich snippets were featured.
The average CTR of 3 months was 10.6% and after making these changes it jumped to 24.5% in 28 days and then to 26.9% in the last 7 days [comparison screenshots attached below]
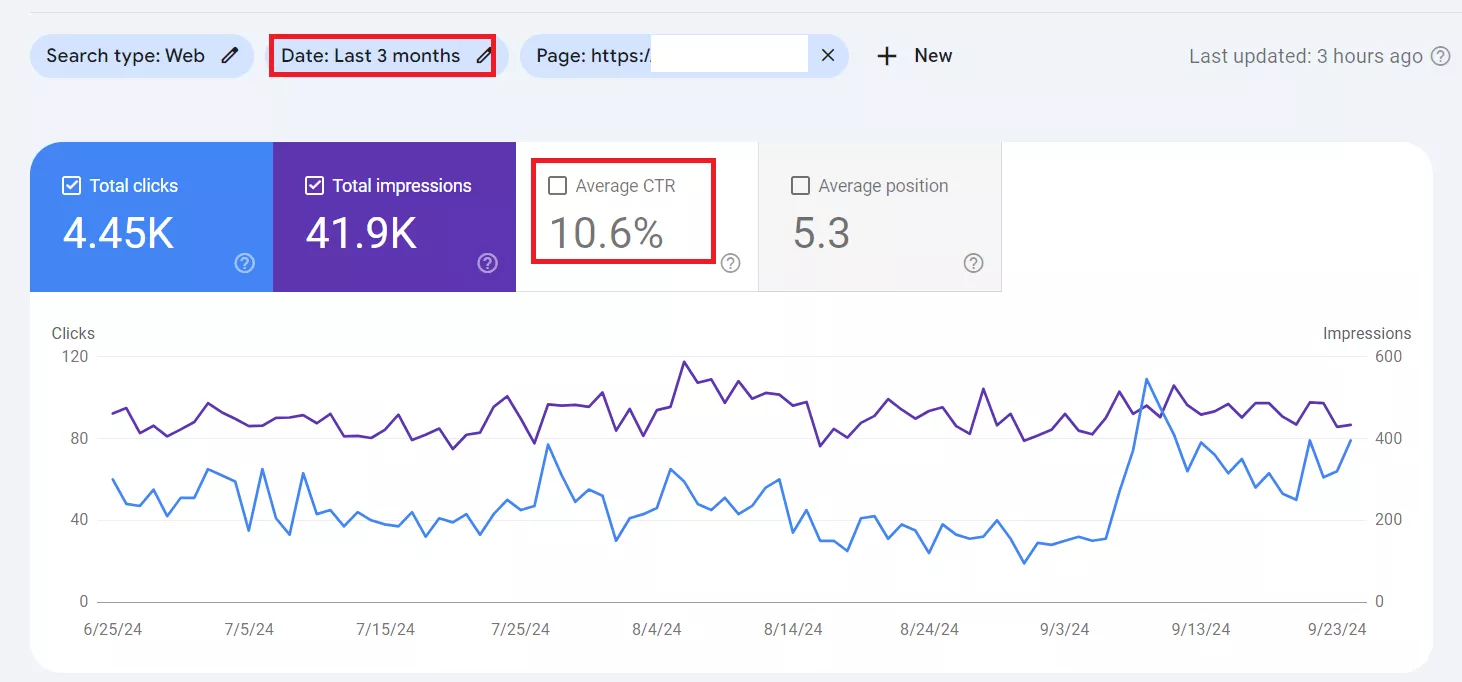
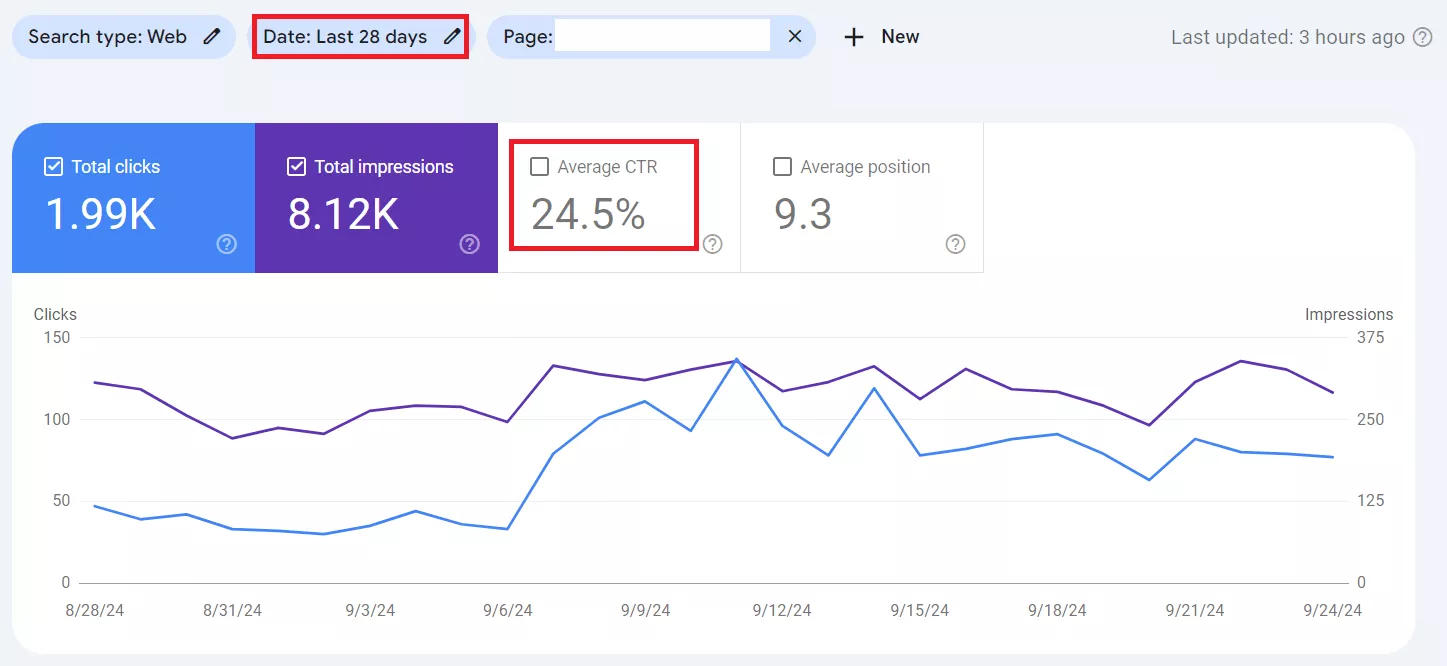
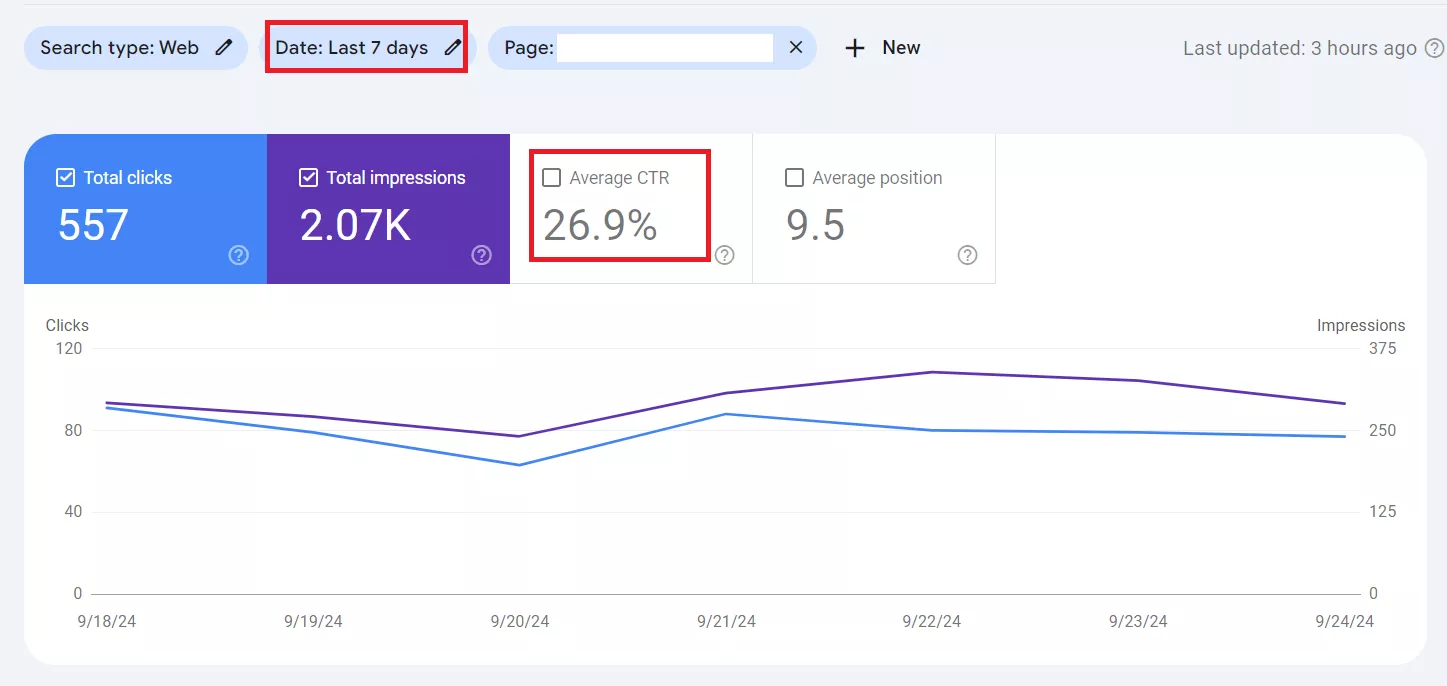
Adding schema markups to blog posts helped his content stand out and in this blog post, I’ll teach you exactly how we did it.
What is Schema Markup?
Schema markup is a kind of special code that you add to your website to help search engines, like Google, better understand what your content is about.
It’s like giving search engines more detailed information about your page, so they know exactly what you’re offering, whether it’s a product, recipe, review, or even an event.
Before I used schema, search engines could understand my content, but not in a very detailed way. Once I started using schema markup, it was like giving Google clear instructions about what’s on my page. This made it easier for my content to show up with rich snippets in search results.
Rich snippets are those extra details you see in search results, like ratings, prices, or cooking times. They make your listing stand out from the regular ones, increasing your chances of getting more clicks.
By adding schema markup, you’re telling Google, “Hey, this page has a recipe,” or “This is a review with ratings,” so they’re more likely to display that extra information when people search for related topics.
Why Use Schema Markups?
Boosts Click-Through Rate (CTR)
One of the biggest advantages I noticed is how rich snippets make your search results more appealing to users. With additional information like ratings, prices, or product details showing up, people are more likely to click on your link.
For example, when I added product schema to my reviews, my CTR increased because users could see star ratings directly in the search results.
Increases Visibility
With more detailed information in search results, your listing stands out. I’ve found that when my posts include rich snippets, they get more attention because they provide more value right on the search results page itself. Users naturally click on results that seem more informative.
Improves Rankings
Although schema markup doesn’t directly affect your ranking position, the higher CTR from rich snippets sends positive signals to Google.
More clicks tell search engines that your content is relevant, which over time can help improve your rankings. Since I started using schema, I’ve noticed a gradual improvement in my rankings for certain keywords.
Overall, Rank Math has made implementing schema easy, and the benefits like increased CTR and visibility have made a noticeable difference in the performance of my website.
How Rank Math Helps with Schema Markup
Rank Math SEO has made adding schema markup to my WordPress site incredibly simple, even without any coding knowledge.
Before using Rank Math, I found it quite complicated to manually add schema code, but with Rank Math, it’s just a matter of a few clicks.
It offers a wide range of ready-made schema types that you can easily apply to your pages and posts.
Whether you’re writing a blog article, selling products, running a local business, sharing recipes, or writing reviews, Rank Math has pre-built schema options for all these.
All you have to do is select the right schema type, and Rank Math takes care of the rest, ensuring that search engines understand your content better.
Now let’s move on to the main topic, how I did that!
Step-by-Step Guide: Configuring Schema Markup with Rank Math
I’ll walk you through how I set up schema markup on my WordPress site using Rank Math. It’s a simple process that anyone can follow, even if you’re not a tech expert.
Step 1: Installing and Setting Up the Rank Math SEO Plugin
First, you need to install the Rank Math SEO plugin if you haven’t done so yet. [skip if you have already installed]
- Go to your WordPress dashboard.
- Navigate to Plugins > Add New.
- In the search bar, type “Rank Math SEO” and press Enter.
- Once you see it, click Install and then Activate the plugin.
- Rank Math will automatically guide you through a setup wizard. Just follow the steps to configure your basic SEO settings.
The setup wizard makes it easy, even for beginners, by giving you the right settings for your site without any confusion.
Step 2: Enabling Schema Markup Module
After installing Rank Math, the next step is to make sure the schema feature is enabled. Here’s how I did it:
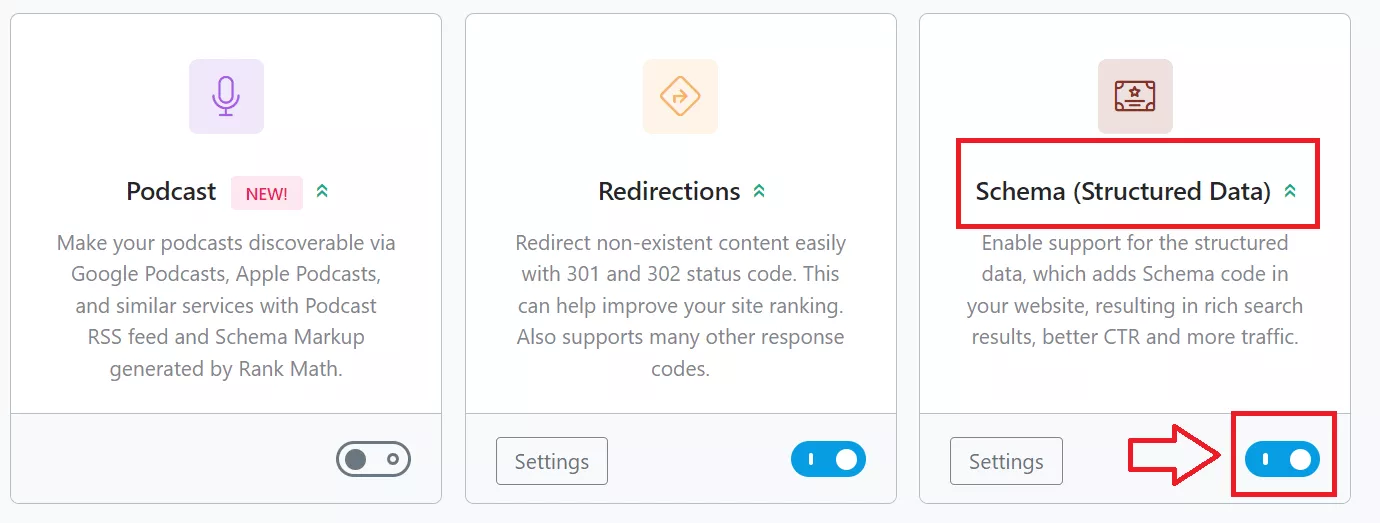
- Go to Rank Math > Dashboard in your WordPress menu.
- Scroll down until you see an option called Schema (Structured Data).
- Simply turn it on by clicking the switch.
Now Rank Math is ready to help you add schema markup to your posts and pages.
Step 3: Adding Schema to a Page or Post
Once the schema is enabled, you can start adding it to your content. This is the part where Rank Math shines because it makes adding schema super easy. Here’s how I did it:
1. Open the post/page where you want to add schema.
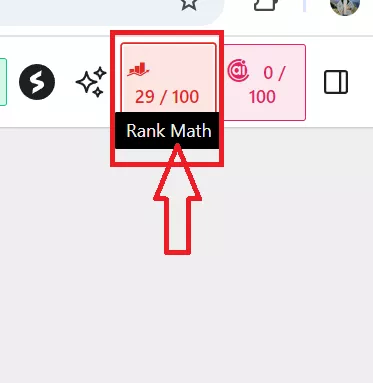
2. Click on the Rank Math Meta Box (you’ll find this under the post/page editor in the top menu bar) and click on it.
3. Click on the Schema tab.
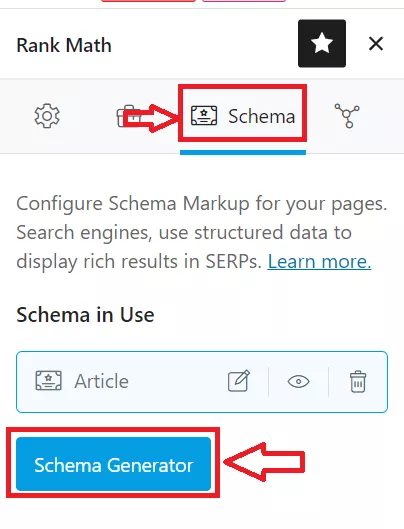
Rank Math will automatically choose the most relevant schema for your content.
For example, if it’s a blog post, it will likely select “Article” as the schema [as shown in the above image].
But if you’re adding a product review, recipe, or event, you can easily change it to the right schema type that you want to add to your post/page.
Just click on the Schema Generator,

A lot of schema types will be available to add,
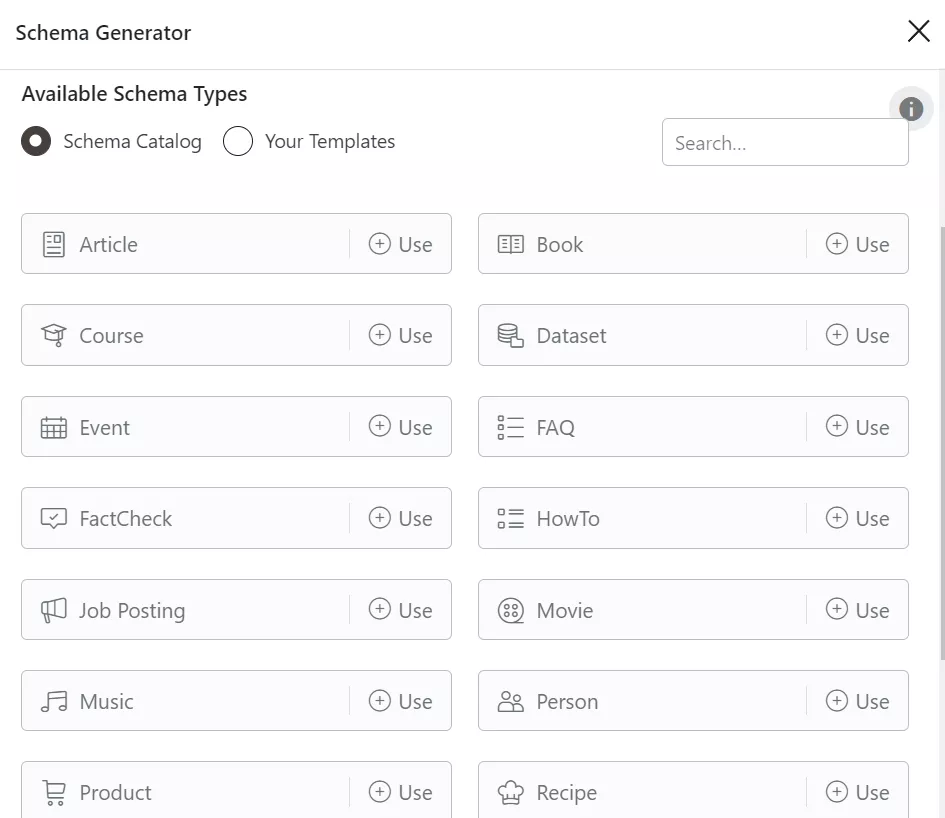
Click on the Use button on the right side of the schema type.
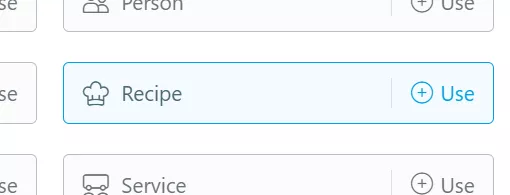
Now you can edit the schema enter all the required details to set it up for rich snippets and click save for this post.
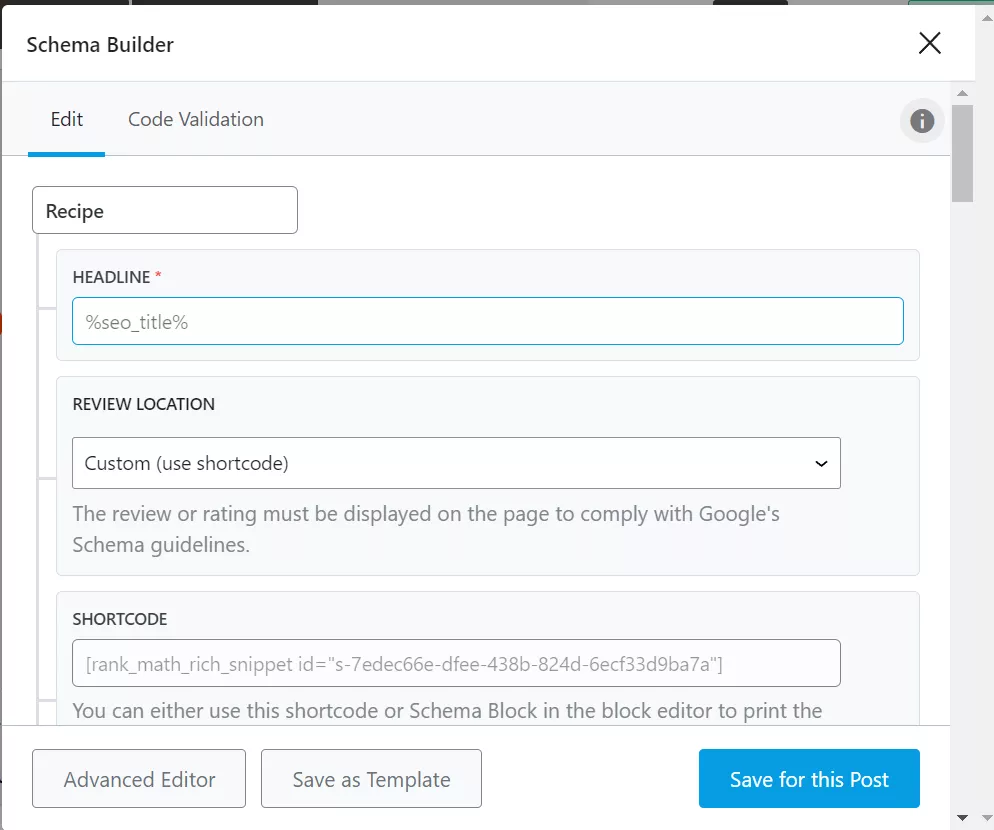
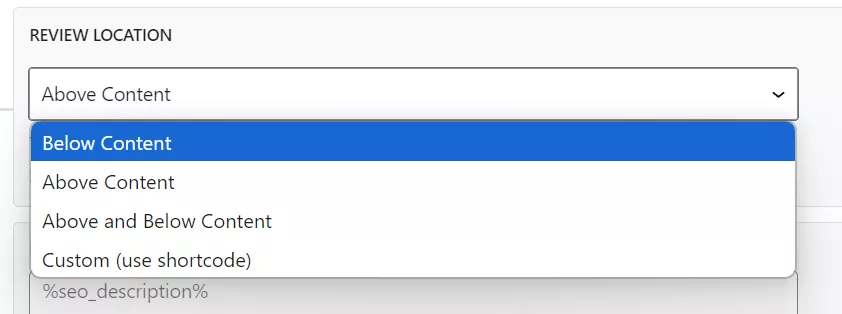
You can also select the review location to show it to your visitor on your post, I’m selecting the above content to show it will be shown just below the post title
As you can see in the below image, here is how the Recipe Schema data would look like:

Rank Math has already shown how to add a Recipe schema correctly here.
So this is how you can add a schema markup quickly to your post/page. Well, adding schema is a lengthy process as you need to enter different data to make it look more attractive.
I will recommend you follow Rank Math’s official documentation before adding any schema to your content.
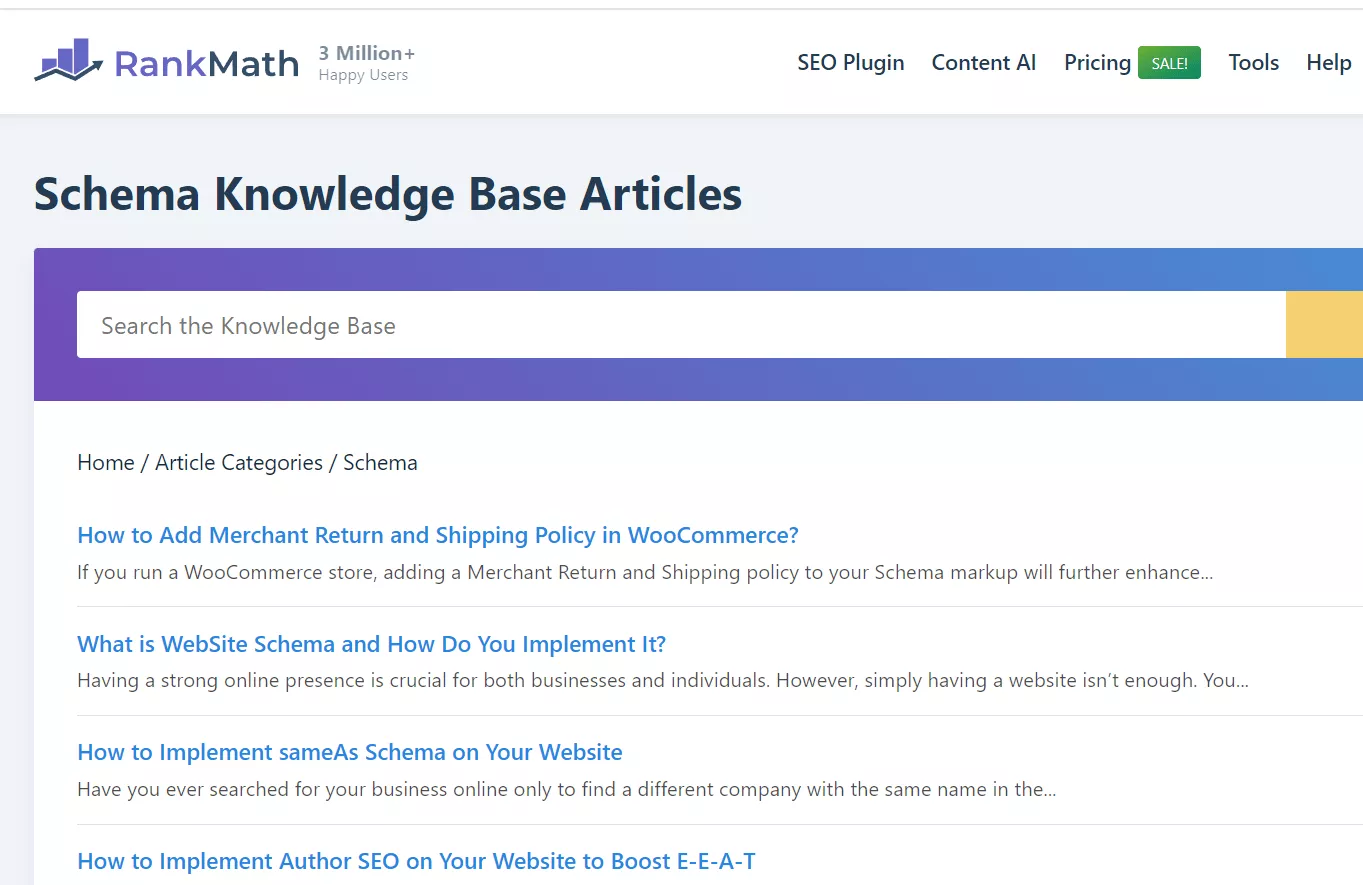
Here you can visit this page: Schema Archives
Step 4: Test Your Schema Markup
Once you’ve added schema to a post or page, it’s crucial to test if it’s implemented correctly. RankMath makes this easy:
1. Go back to the Schema tab in the RankMath Meta Box on your post/page editor, and click the edit button.
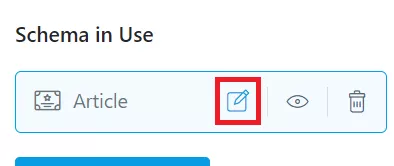
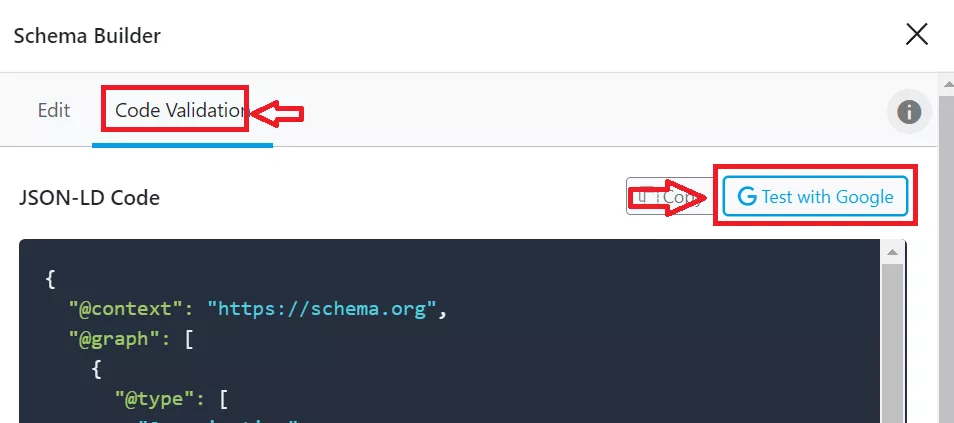
2. Then click the Code Validation tab and the Test with Google button to open Google’s Rich Results Test tool, you will be redirected to Google’s rich snippet test page.
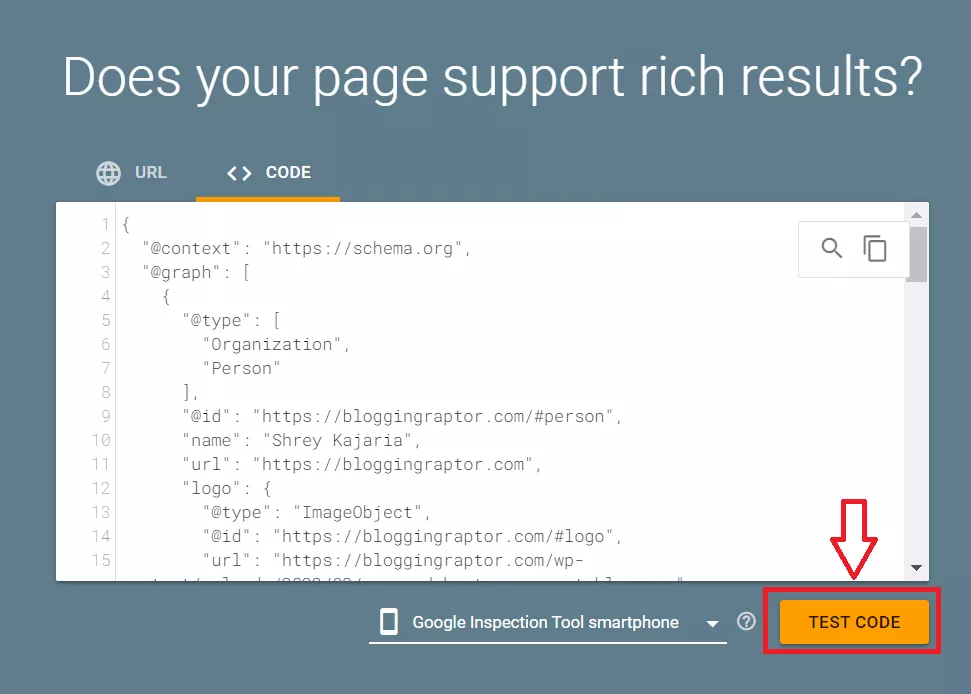
3. Then click the Test Code button to start the test.
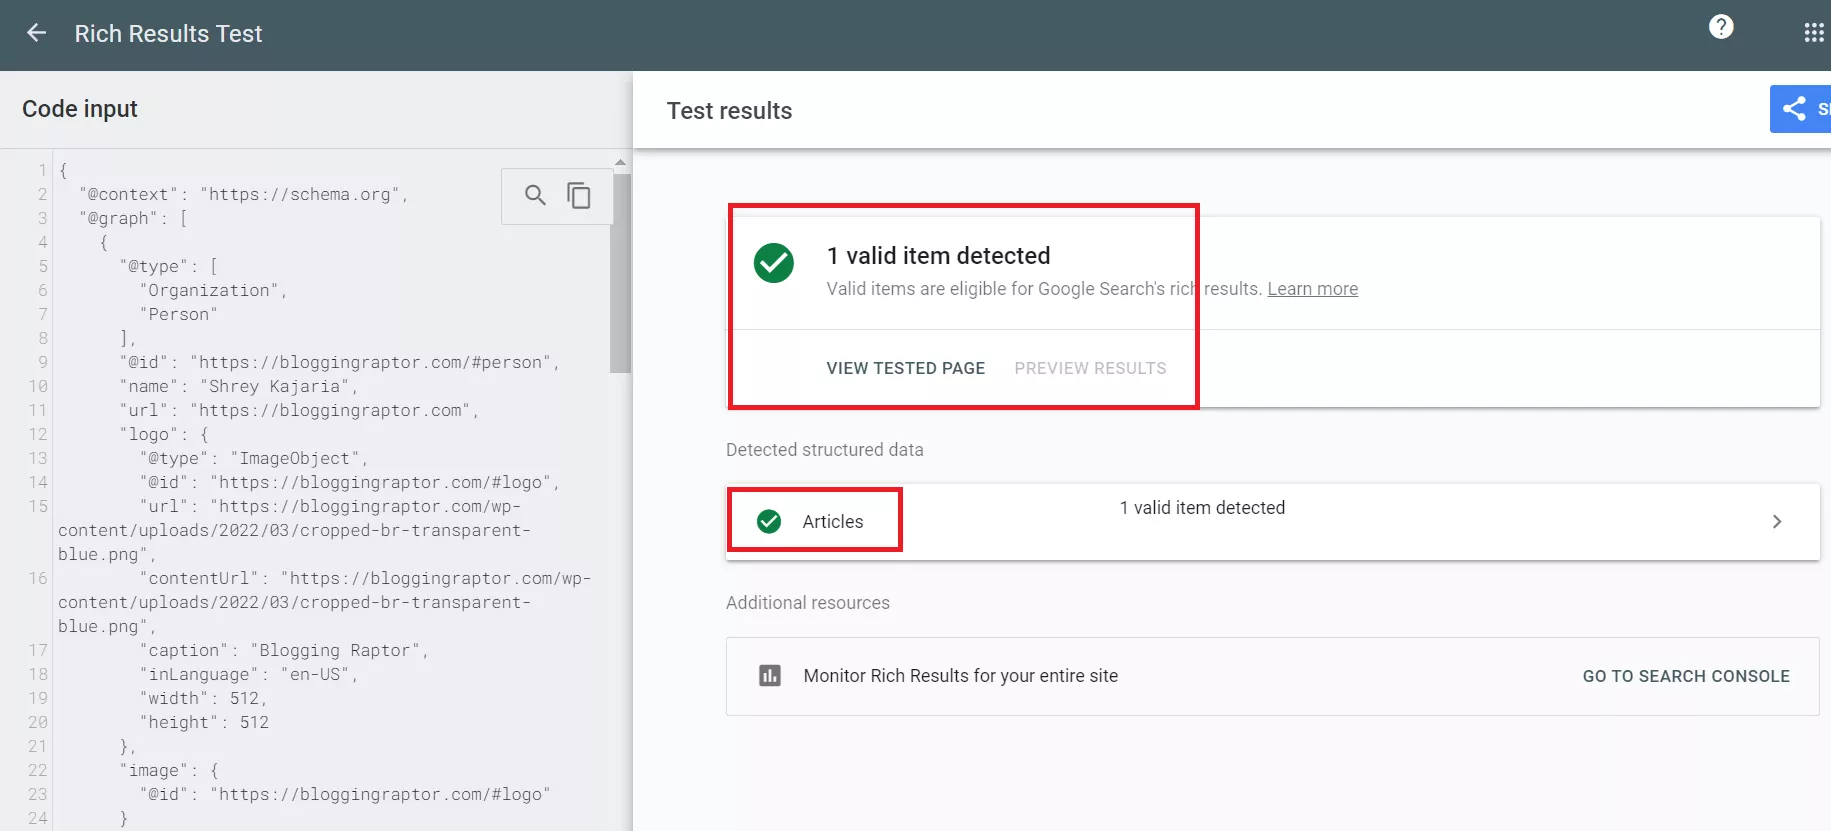
4. You will see the results, if everything is okay then you’re good to go and publish your post/page.
5. If you see any invalid items error, just click on the detected invalid item,
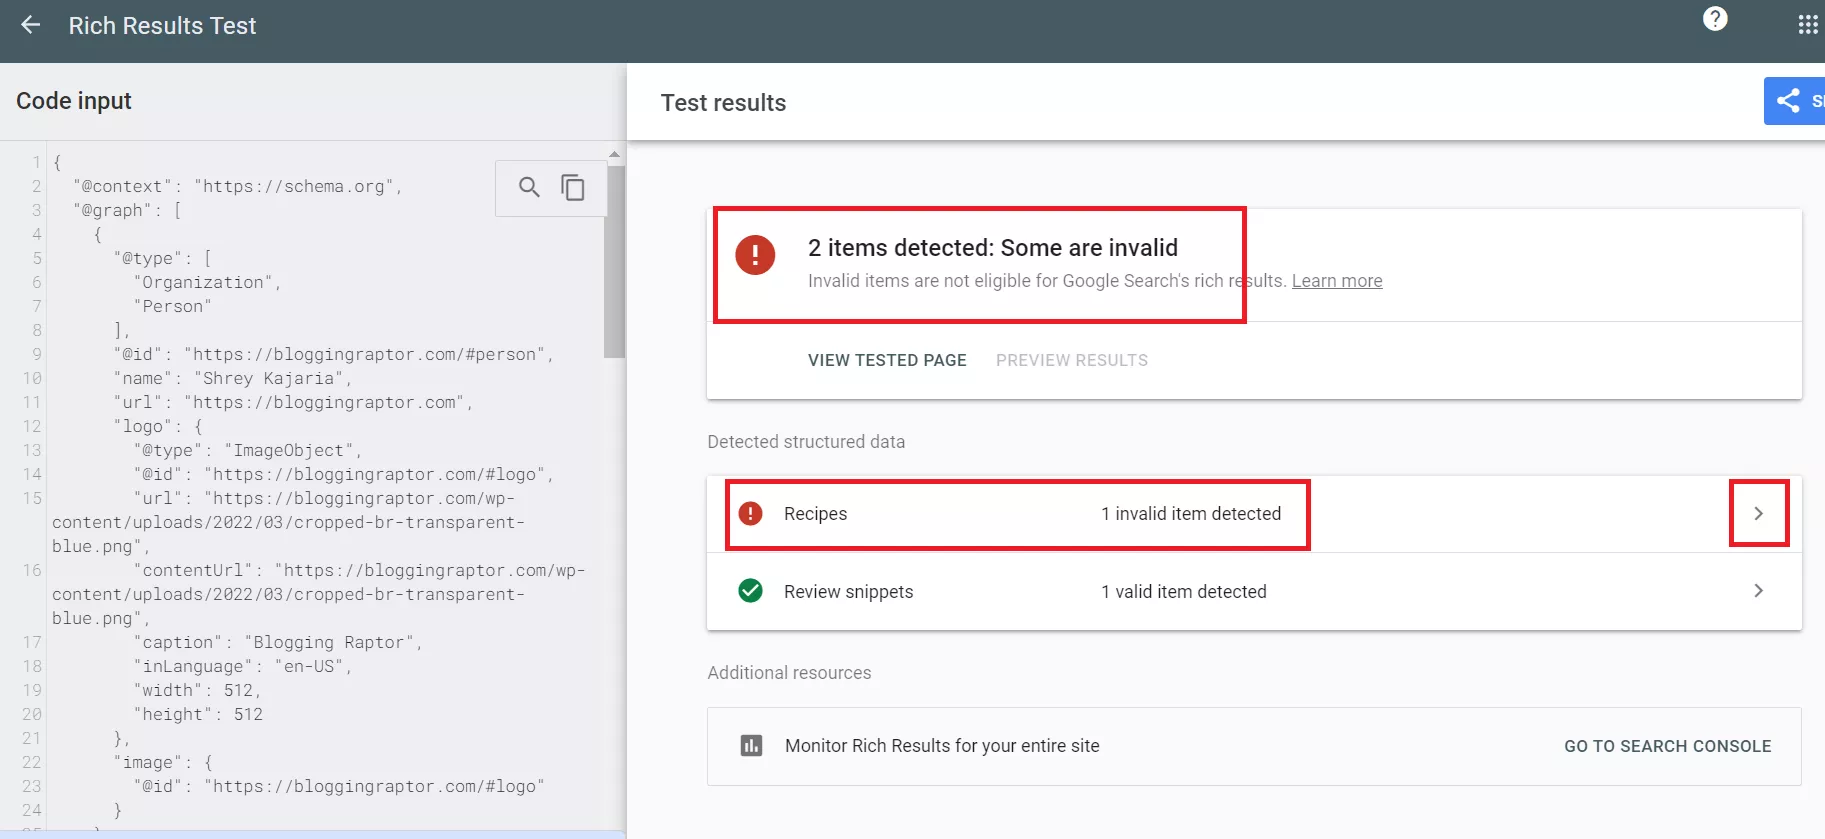
6. Then just click on the detected items tab
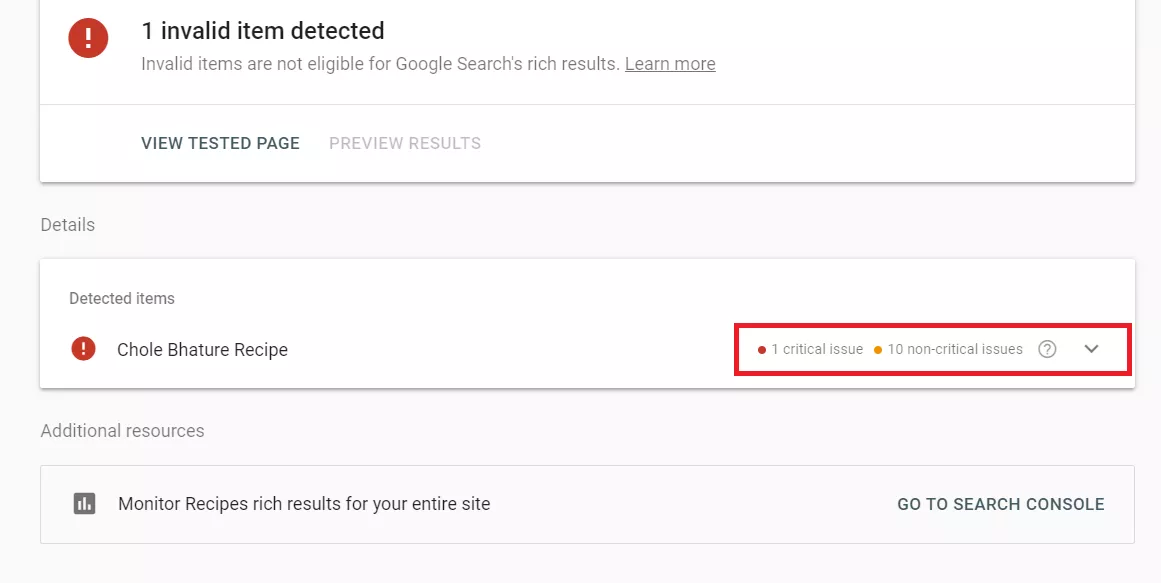
7. you will be able to see all errors or missing fields that need to be entered or fixed.
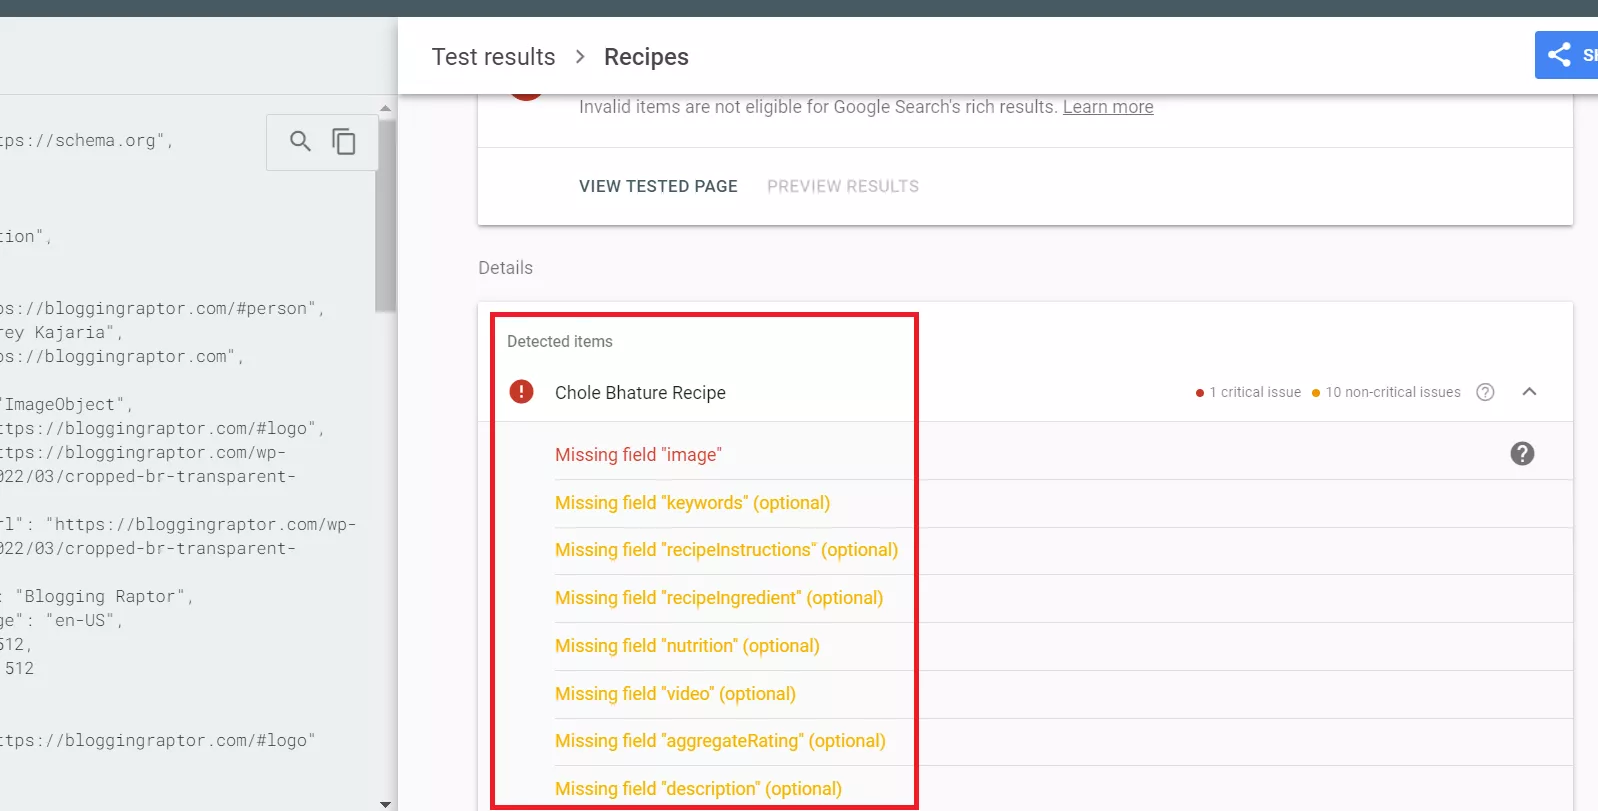
After entering missing fields and fixing all errors, do another test, everything will be fixed and then you can publish your post/page. That’s all.
Different Types of Schema in Rank Math
Rank Math has both Free and Pro versions, they provide many schema types in the Free and some more advanced in the Pro plan, here’s a detailed Rank Math Free vs Pro guide to know more about it.
Schema Types Available in Rank Math FREE
Schema Types Available in Rank Math PRO
So these are the schema types available in Rank Math Free and Pro versions.
Overall, by integrating RankMath’s schema markup feature, my blog posts saw a noticeable increase in both visibility and CTR. Not only were my posts getting more impressions, but the engagement from users improved as well.
It’s clear to me that schema markup is a powerful tool for any website looking to improve search visibility and attract more traffic.
Conclusion
In conclusion, using schema markup has been a real game-changer for my blog and my friend’s recipe site.
With Rank Math’s easy-to-use schema tools, we were able to improve our search visibility, get more clicks, and increase our organic traffic.
Rich snippets help your content stand out in Google’s search results, and while schema may not directly boost your rankings, it leads to higher engagement, which can positively impact your site over time.
Whether you’re running a blog, recipe site, or product reviews, schema markup is important for staying competitive in SEO today.
Rank Math makes it simple, even if you aren’t a tech expert. If you’re looking to improve your visibility and get more clicks, start using schema markup—it’s one of the easiest ways to make your site stand out in search results.